|
More Than Knots |
|
Tying Ring Bolt Hitching on a Walking Staff |
|
Ring Bolt hitching on a walking staff has a great look and feel. It is attractive, tells the viewer you’re serious about hiking, is a great conversation piece, and displays your knotting ability. It can also be used as a nice handle for the staff.
The staff at the left is partially covered with Ring Bolt hitching. Since I teach how to cover your staff with Ring Bolt hitching to Boy Scout troops, I covered the ends with a 3L4B Turk’s Head (otherwise known as the Boy Scout Woggle). It sets off the hitching and has a meaning to the scouts.
In this part of my web site, I’ll go over the steps necessary to tie Ring Bolt hitching onto a walking staff. Since I’ve used a standard blank for the staff (available at the Boy Scout shop), I’ll give cordage lengths for this size staff. For larger or smaller staffs, you’ll have to adjust the length of the cord accordingly.
Items needed:
1 walking staff— blank available at Boy Scout Shop. Diameter of staff: 1 1/2 inches #72 cotton cord, three stranded—three lengths 6 feet long. #72 cotton cord, three stranded—two lengths 5 1/2 feet long Cotton string—two lengths 6 feet long Masking tape Minwax Polycrylic—Clear Satin—small can Paint brush Large cup for mixing water and Polycrylic Small rubber bands
Time to finish: Three to four weeks with drying time. |
|
Step 1:
Take three six foot strands of the #72 cotton cord and lay them in parallel lines on the walking staff. Make the length for this part about six inches long.
After you have laid down the strands, use masking tape and tape them to the staff. |
|
For this example and for clarity, I used a cardboard cylinder instead of the walking staff blank. The lengths I gave you are for the standard blank.
The knot tying work is the same whether it’s for the walking staff blank or for a cardboard cylinder.
Some pictures will be used more than once to provide clarity. |
|
Put masking tape over the first three lines.
Lay the lines parallel on the walking staff. |
|
Step 2:
After you have taped the ends to the staff, go down about six inches and tape the three parallel strands to the staff again.
Take the long ends of the strands and wrap them into bundles using the small rubber bands. This will keep the long ends out of the way until you are ready to start hitching. |
|
Put masking tape over the first three lines at the six inch mark.
Wrap the ends of the lines into bundles using small rubber bands. |
|
Step 3:
Using one of the six foot lengths of string, tie it onto the staff using either a clove hitch, strangle hitch, or snuggle hitch. This will get it started.
Tie the remainder of the string onto the staff using half hitches. This is called Grapevine Hitching or French Hitching. It is also called Grapevine whipping or French Whipping. Keep tying half hitches until you run out of string.
This will form a secure base from which you can start your Ring Bolt hitching, |
|
Start with a Clove hitch, Strangle hitch, or a Snuggle hitch.
Half hitch (Grapevine hitching) until you run out of string. |

|
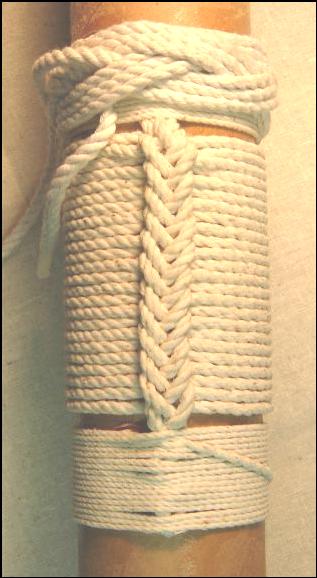
Step 4:
Below the secure base you just tied using the string, start tying your Ring Bolt hitching.
Keep tying Ring Bolt hitching keeping the half hitches as straight as you can. Keep the lines as tight and as straight as you can.
Keeping the lines straight and tight will make a nice handle for your staff.
Keep tying the Ring Bolt hitching until there isn’t enough to form any more half hitches. |
|
Masking tape to hold the six foot strands.
Grapevine hitching to form a secure starting base.
Ring Bolt hitching to form the handle.
Keep half hitches and strands as straight as you can.
Continue hitching until you use up all of the six foot strands. |
|
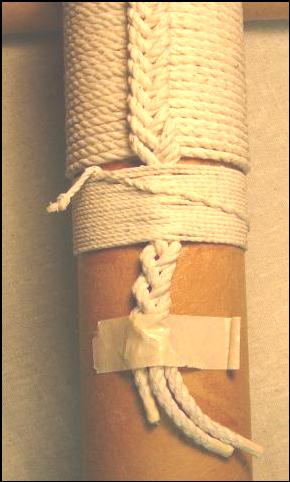
Step 5:
After you have run out of cordage to form the Ring Bolt hitching, take the remainder of the three strands and weave it into a three stranded weave.
Lay the three stranded weave onto the staff and tape it with the masking tape.
Then Grapevine hitch another piece at the bottom to create a secure base. |
|
Ring Bolt hitching until you run out of cordage.
Grapevine hitching to form a secure ending base.
The remainder of the cordage will be cut off.
Tape the end of the cordage until you have Grapevine hitched the loose ends. |

|
Step 6:
At this point, I make sure all of the cordage is straight and pushed together. I try to make all the lines as neat as I can.
Then, using a 50/50 mixture of water and Minwax Polycrylic and a small paint brush, I paint the cordage with the solution of Polycrylic and water. The cotton cord soaks up the polycrylic and becomes plasticized. Make sure the cordage is well covered with the solution as the cotton will wick up a thin coat. When in doubt, go heavy instead of light.
This will waterproof your handle and also make it even tighter on the walking staff. It usually takes two to three days for the cordage to completely dry, so I start on one weekend and leave it dry throughout the week. Then I go back the second week and put on a second coat. Making sure as I go along to fill every nook and cranny with the Minwax Polycrylic solution. On the second week, I apply two coats of the solution. This is a total of three coats.
After the cordage has dried for the second week, I’m now ready to clip off the loose ends and cover the Grapevine hitching with the Turk’s Heads (Boy Scout Woggles). |
|
Step 7:
Take the two 5 1/2 foot strands of #72 cotton cordage and make two 3L4B Turk’s Head (the Boy Scout Woggle).
Slide the woggles over the Grapevine hitching. Fair up (neaten) and tighten the woggles on the hitching.
Paint the 3L4B Turk’s Head knots with the first coat of the polycrylic mixture. Leave them dry for several days between the paintings until they have set in their final shape.
Clip off the ends of the Turk’s Head knots when painting on the first solution. Hide the ends in the Turk’s Heads so they can’t be seen.
When the Ring Bolt hitching and the Turk’s Heads knots are finished, you’ll have a very nice looking walking staff. |
|
After forming the 3L4B Turk’s Head, slide it over the Grapevine hitching and tighten.
After painting the 3L4B Turk’s Head knots with the polycrylic mixture, clip off the ends and hide them in the Turk’s Head.
Clip off the ends after you have applied the first coat of the polycrylic mixture.
Keep the Grapevine hitching as tight as you can when tying it on the base.
|

