

|
The corporation that owns the Santa Maria, a full size replica of Christopher Columbus’ flag ship, in Columbus, Ohio converted a barge from a carpentry shop into a Visitor’s Center. After the conversion they had about eight square feet of blank wall they needed covered and felt a knot board would be a wonderful addition to the center. It would keep with the nautical theme and serve as a focal point. As an assistant rigger and also an IGKT member, I was approached to make a suitable knot board. |
|
The Santa Maria, Columbus, Ohio,USA |
|
I had a discussion with the Visitor’s Center manager whether or not the knot board should be one board 4x8 feet or two boards 4x4 feet. We settled on two 4x4 boards to have a separate knotting theme for each board. Another Santa Maria volunteer was able to finish a 4x4 board that could be used as the base. Work started in the summer of 2005.
|
|
Previously I had worked on various smaller boards and had purchased some three stranded, cotton cordage 3/16 inch in diameter. I found this cordage makes a knot large enough to show details, is easy to work, and will take a preservative so the knots can be mounted easily. |
|
Preservation of the knots was done by soaking them in a 50 / 50 mixture of Minwax Polycrylic (Clear Satin) and water. The cotton wicks up the polycrylic and as it dries, it becomes plasticized, which permanently holds the shape into which the knot has been molded. |

|
Tying the knots was the easy part. Preserving the knots, doing the layout, mounting, and documentation took up about 80% of the time needed to make the board. After the knots were tied, a paper tag with the knot name was attached to the knot so it could be moved around where needed without losing its identity. |
|
A spreadsheet with knot names was started so as knots were tied there wouldn’t be duplicates. This may sound peculiar but after making about 30 knots, it is difficult to keep track of what knot you did, or did not, tie.
After the labels were attached, the knots were “painted” with the polycrylic mixture using a brush for application. However, after about two hours of bending over a work surface and getting a screaming backache, I decided there had to be a better way. Stopping at a local dollar store gave me a chance to pick up some inexpensive aluminum roasting pans. I mixed a larger batch of the Minwax 50 / 50 mixture, poured it into a roasting pan, and dunked the knots into the mixture. This sped up the preservation process quite a bit. |
|
Centerpiece mat |
|
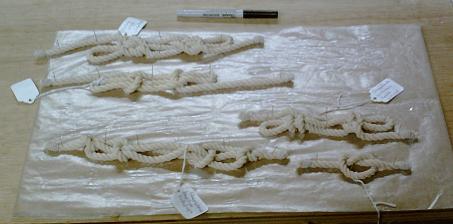
After the knots had been dunked in the preservative mixture, they were laid on a cardboard covered with wax paper. The wax paper prevented the treated knots from sticking to the cardboard. I did find one problem with this process. After being soaked with polycrylic, the knots would sometimes twist into malformed pretzels and ruin the knot. So I had to literally pin the knots to the cardboard using straight pins (and later brads) to form them into the shape I wanted until they dried. Once dried, the knots were frozen into the shape needed to best display the knot. |
|
The next problem was the layout. I recruited another IGKT member John Dickey (who is also my brother) to help with the design. He has had years of layout experience as a CAD / CAM designer and was able to come up with a great presentation. He designed an invisible X layout with a Carrick Bend Wreath as the focal point which we kept all through the workup. The design breaks the board into four pyramid sections and by running the knots vertically or horizontally, it gives the board a more organized and symmetrical layout. |
|
Knots pinned and drying |
|
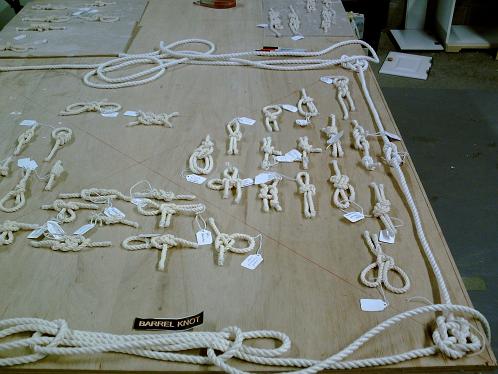
In January 2006 I thought I had hit the jackpot. I was given access to a 1000 square foot, empty, heated warehouse. I moved in and started the preservation, setup and layout in earnest. There was enough room to put down a 4x8 sheet of plywood for use as a temporary, full sized, layout board. The larger board enabled me to move knots around to make the best presentation, slide knots off if I felt they didn’t fit into the scheme, and try out different angles in which to place the knots. I could also test out border designs and labeling schemes. The warehouse came with a large stepladder that could be used as a scaffold to take digital pictures. Taking pictures from above gave me an idea of how the knot board would look when displayed in a vertical position. It was a perfect setup. |
|
Unfortunately and unbeknownst to me, the person who had offered the warehouse didn’t have the authority to offer the space. When the landlord found out, I was unceremoniously thrown out. Having just a couple of hours to clean out my belongings, I very carefully put the knot layout on cardboard sheets and stacked them in my van. I was hoping to keep the layout intact for the next site but a sudden swerve and stop on the way home dumped the knots in a pile on the floor. So it would be back to the layout board before I could continue. |
|
Trying to find warehouse space that would fit in the budget (zero dollars) proved to be impossible. So I had to wait until the weather got warm enough to use my garage. (My wife has been VERY understanding throughout this entire project!) Fortunately, once I was able to move into the garage, I was able to very quickly reproduce the layout that I had in the warehouse and move onto the next phase. Unfortunately my garage doesn’t have enough room to put down a 4x8 and 4x4 board at the same time. So I had to work off the digital pictures. Fortunately the digital pictures were a great help and I was able to complete a tentative layout on the 4x4 board. |
|
The next hurdle was the border for the board. From the start I had envisioned using 1/2 inch cotton cord as a rope border. Once again I used the polycrylic mix to fix the rope into a permanent shape. I had planned to use a Man O’ War sheepshank at the top and bottom of the board, but the layout showed it would overpower the board and cut down on the space available for the knots. I finally settled on a Double Bowline Bend with a Reef Knot across the top and bottom. At first I used a single strand down the sides with a Figure Eight knot. Everything went very well until I started to preserve the rope for the border. I discovered what everyone who has done a load of laundry knows. Cotton shrinks! |
|
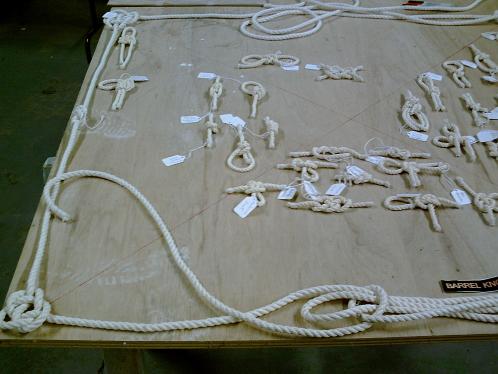
Quarter panel layout |
|
I painted a couple of coats of polycrylic on the cotton rope border and thought it would be enough to fix the cotton but it didn’t. After it was soaked in the 50 / 50 polycrylic solution, it started to shrink. It didn’t stop shrinking until it was too small to fit on the board. Anytime something like this happens, you just have to create a positive outlook on the situation. So I took this as an opportunity to make another border. (But I sure didn’t feel that way!) For the second border I recreated the Double Bowline Bend across the top and bottom of the board. Instead of using the single Figure Eight knot for the sides, I cut the side border in half and tied a Square (Reef) knot in the middle and seized the ends. This allowed me to adjust the border to fit the board in spite of shrinkage during the drying process. Even then I had to tie down the border while it was drying to keep it stretched to the dimensions I needed. |
|
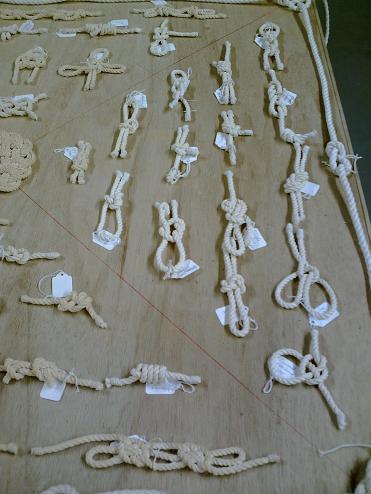
Left side layout |
|
When finished, the border consisted of a Double Bowline Bend with a Reef knot across the top and bottom of the board. At each corner I made a Sailor’s Breastplate knot (Carrick Bend on the bight) to turn the rope 90 %. The sides are a Square (Reef) knot with the ends seized. Seizing on the ends of the Square knots is Round Turn Seizing. All ends are whipped using common whipping. Because all cordage on the board is cotton dipped in preservative, cotton string was used for the whipping. After preservation and drying the ½ inch cotton cordage made a suitable border. Before the cordage was permanently attached, holes were drilled in the corners of the board and ¼ inch carriage bolts were installed for later mounting on the wall. |
|
During the layout work I had planned on putting the knot labels on the board with the knots. Once again the layout showed this would clutter the board and take away from the main attraction - the knots. So we settled for numbers beside the knots and separate description sheets. Two sheets were made, one alphabetical by knot name and the other in numeric order by numbers on the board.
Another question was to either put the knots behind glass or keep them out in the open. Because of the size of the board, we found it was prohibitively expensive to put them behind glass, and it was even more expensive to use Plexiglas. It is also much more difficult to study the makeup of knots when they are unavailable for close study. In the past I haven’t had any major problems with the knots being in the open. So it was decided to go without glass. The next question was how to attach the knots to the board.
I have seen several methods of attaching knots in the past, each with advantages and disadvantages. On other boards I used hot glue and ran into situations where knots had either fallen off the board when humidity changed or they had fallen off the board when people touched them. |
|
And at times, to get enough hot glue to stick, we would have to apply globs of glue to hold the knots. I felt using hot glue was not a viable option. |
|
Right Quarter Panel Layout |